I did it! A few weeks ago I mentioned that I was going to decorate my mantle by Halloween and I actually finished the project with one day to spare!

Read on to see how I went from inspiration to reality…
A few weeks ago I wrote about finally having time to indulge my crafty side. I challenged myself to spend under $40 to recreate what would have been a much more expensive look if purchased…

I went a little over budget (unusual for me but I NEEDED the bird cage), spending $61 for the following ‘raw’ materials that I did not already have:
- 2 medium white pumpkins @ $6
- 3 small and 3 tiny oranges @ $4
- 2 Target Red Zone ‘sparkle’ pumpkins @ $6
- 2 spools ribbon @ $3
- 1 can black enamel spray paint @ $4
- 2 bottles craft paint for glass @ $4
- 1 package black rhinestones @ $3
- 5 wine glasses @ $4
- 1 silver glass candle holder @ $2
- 1 sheet black glitter paper @ $4
- 1 Hobby Lobby bird cage @ $7
- 1 9 pack LED glitter candle lights @ $5
- 1 12 pack tall white taper candles @ $6
- Gorilla Glue @ $3


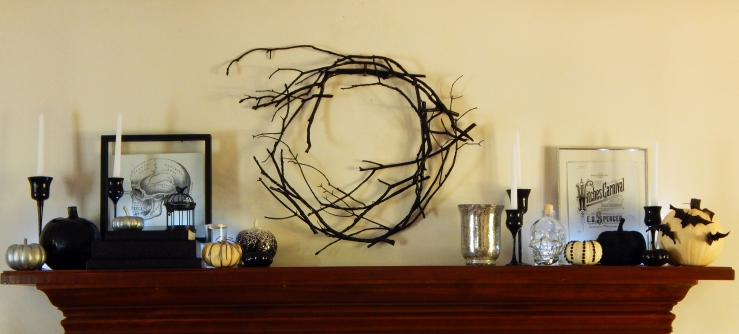
I began with the wreath first because I thought it might take the longest to make and I was right. I used the free sticks from my back yard and began by laying out a few sturdier pieces to form something close to a circle, gorilla gluing and blue taping as I went along. I needed three separate days to build the wreath and another to spray paint it with glossy lacquer but once finished I had this appropriately spooky piece…

In between working on the wreath I focused on the pumpkins and the candelabra. I love to shop at Goodwill for china, glassware, baskets and fabric for pieces that I can transform to help set the scene. I hit the store on half-off weekend and found the perfect glasses and picture frames for the mantle design.

It was such a beautiful day when I painted the glassware and pumpkins that I wished I had more things to transform.

I had a lot of fun with the pumpkins too. I kept to a black, white and silver color scheme, using paint, ribbon, and rhinestones to make a variety of pumpkin looks.

I used the black glitter paper to cover the spines of some thick books so they appear ‘haunted’ and to create a few bats that fly across one of the larger pumpkins. I needed some art so I searched online for vintage Halloween advertisements and printed those out, then put the prints in the Goodwill frames. After all of that I got to put it all together…


I wish I could show you how the mantle looks when its entirely dark except for the tea lights and candles (trust me – it is awesome!) but my photography skills are a bit lacking when it comes to shooting in the dark.
Did you decorate your space or will you dress up for All Hallow’s Eve? I’d love to know what you have planned for Halloween….
.

[…] fall I am planning my Halloween, Thanksgiving, and Christmas mantle looks (see my 2016 looks here and […]
LikeLike
[…] was this past Halloween and I was so happy with the results (see my dream and reality here) that I am attempting a Thanksgiving look […]
LikeLike
Very cool work! Congrats to you for the ingenuity…….
LikeLike